Wednesday, July 2, 2014

how generate private key by putty keygen for openshift(by putty keygen)

We're assuming that rhc setup ,because only then you have public key for communication to openshift server.


1.please check C:\Users\user\
2.do you find a folder as ".ssh"(this is the folder,where we generate public key by rhc setup)
3.if no,please 

FOLLOW "rhc setup",here - RHC SETUP.


Install and Setup PuTTY SSH Client for Windows

Using SSH on Windows

PuTTY is a popular free SSH client for Windows. This document shows how to install and configure PuTTY so that you can connect to your application with SSH on a Windows machine.

Download the PuTTY Installer

Get the installer from the PuTTY download page
Make sure you download the latest stable release under the headers Binaries/A Windows installer for everything except PuTTYtel. It should be named something like putty-0.63-installer.exe.

Running the Installer

After downloading the installer, using File Explorer open up the folder you downloaded it to and double click on the icon to run the installer.
Step 1: You are greeted by the Welcome dialog. Click the Next > button to continue
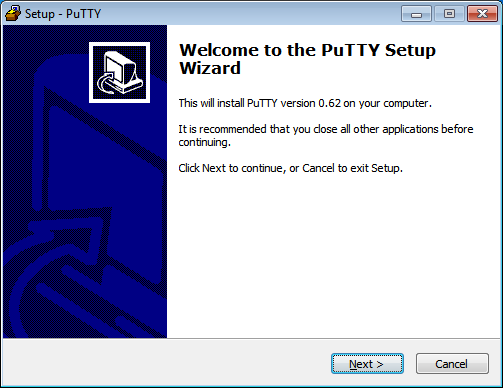
Install PuTTY on OpenShift Wizard Step 1: Welcome screenshot
Step 2: The wizard asks you to select a directory to install PuTTY to. Use the default and click the Next > button to continue.
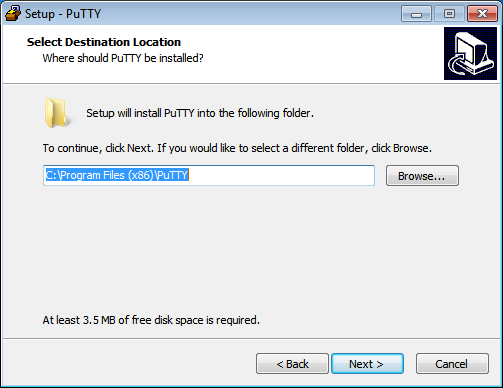
Install PuTTY on OpenShift Wizard Step 2: Select install directory screenshot
Step 3: The wizard asks which folder you wish to put PuTTY into on the Start Menu. Use the default and click the Next > button to continue.
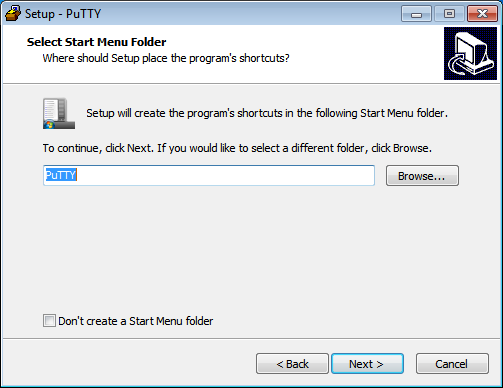
Install PuTTY on OpenShift Wizard Step 3: Start Menu location screenshot
Step 4: You are asked additional questions. You can choose to have an icon placed on your desktop or on the Panel as a quick start button for easier access to PuTTY if you wish. We recommend keeping the option for associating .ppk files checked. Click theNext > button to continue.
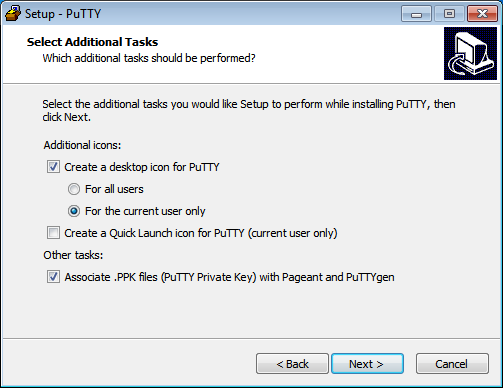
Install PuTTY on OpenShift Wizard Step 4: Additional options screenshot
Step 5: PuTTY is ready to install. Click the Install button to start the installation process.
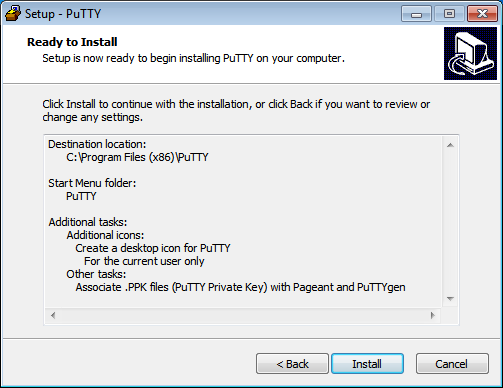
Install PuTTY on OpenShift Wizard Step 5: Install screenshot
Step 6: Click the Finish button to exit the installer. We recommend reading the README file for further information about PuTTY.
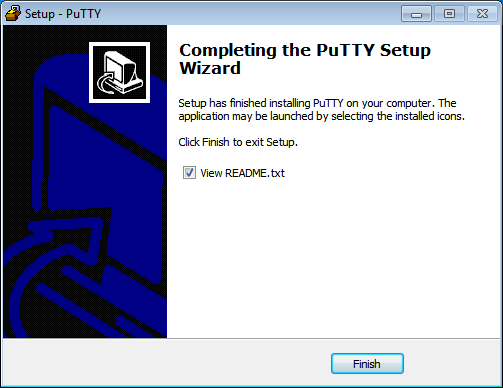
Install PuTTY on OpenShift Wizard Step 6: Finish screenshot

Importing Your SSH Key

We're assuming that rhc setup was already run or that you have completed alternate steps to create an SSH key pair for use with OpenShift. We want to import that key for use with PuTTY.
If you have not run rhc setup, visit the RHC SETUP page and complete the Command Line setup steps before continuing.

Step 1: Launch PuTTYgen
Launch PuTTYgen, the PuTTY key manager. From the Start Menu type putty in the search box. A list of putty applications shows up. Click on PuTTYgen. On older versions of Windows navigate to the PuTTY folder and launch it from there.
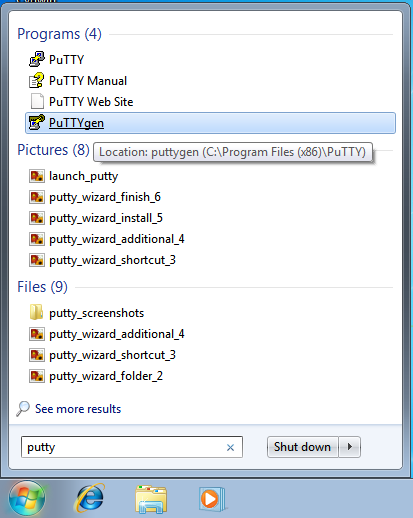
Install PuTTY on OpenShift Import SSH Key Step 1: Launch PuTTYGen screenshot
Step 2: Import the SSH Key
Once PuTTYgen starts go to the Conversions menu and select the Import key item.
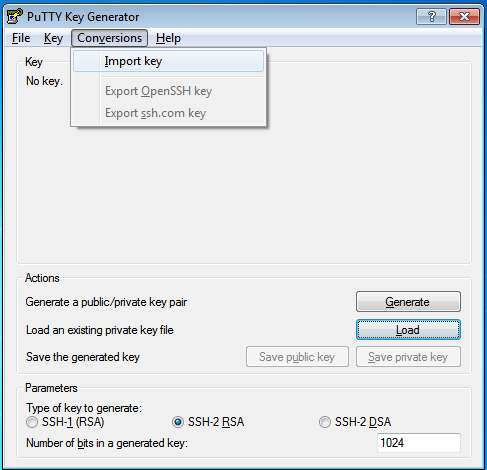
Install PuTTY on OpenShift Import SSH Key Step 2: Select Import key menu item screenshot
Step 3: Select the SSH Key for Import
A file dialog should pop up. Navigate to the .ssh directory in your user folder C:\Users\<user name>\.ssh and select the id_rsa key that was generated for you by rhc setup.
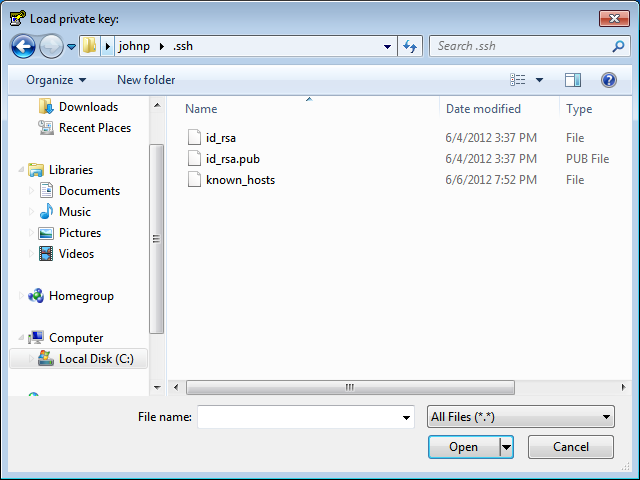
Install PuTTY on OpenShift Import SSH Key Step 3: Select your private key screenshot
Step 4: Save the Private Key as a .PPK File
PuTTYgen loads your key and displays it. Click the Save private key button in this dialog.
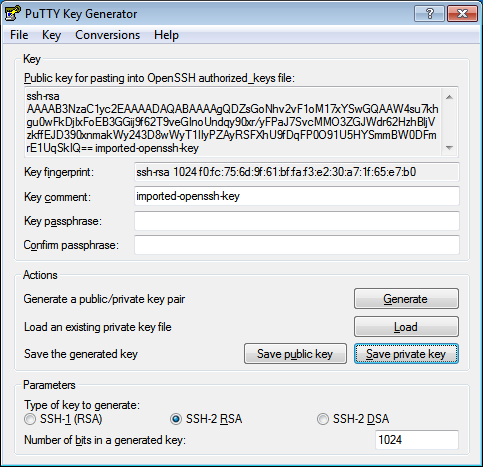
Install PuTTY on OpenShift Import SSH Key Step 4: Save your private key screenshot
Step 5: Select a Key Name
Another file dialog pops up prompting you for a location to save the key. Again navigate to the .ssh directory in your user folderC:\Users\<user name>\.ssh. Name the key something you will remember and make sure you do not overwrite any files in this directory. Good names to use are default.ppk or id_rsa.ppk.
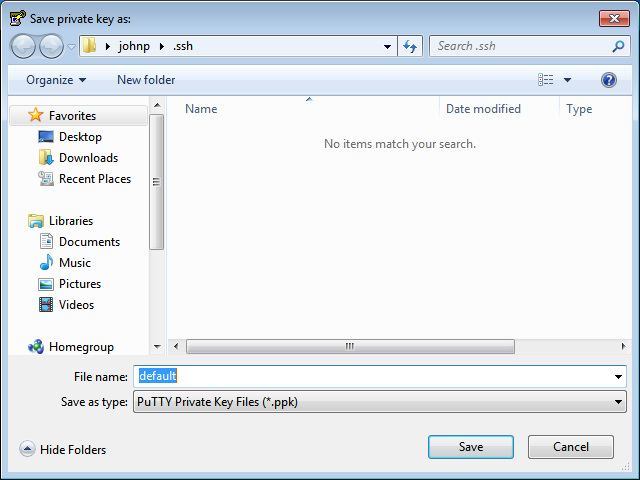
Install PuTTY on OpenShift Import SSH Key Step 5: Select a key name screenshot
You've imported your SSH key and may close the PuTTYgen application.

Configuring a Session to Connect to Your Application

We are assuming you've already created an application on OpenShift and now want to configure PuTTY to easily connect to it with SSH.
Step 1: Launch PuTTY
If you selected the option to put an icon on the desktop or a button the start menu, launch PuTTY from there. Otherwise, click on the Start menu and in the search box type in putty. Select the PuTTY application to run. On older versions of windows you may need to navigate to the PuTTY directory in the Start Menu and launch it from there.
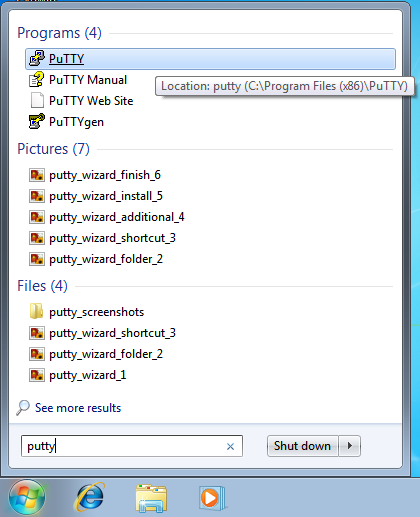
Install PuTTY on OpenShift Configure a PuTTY Session Step 1: Launch PuTTY screenshot
Step 2: Get the SSH Address
Now we need to get the ssh address of your application to enter into PuTTY. The easiest way to find the SSH address is find it in the applications list page of the web console and click on your application to reach the details page. Once on the details page, click on the Want to log in to your application? link to expand the text. This text includes the ssh command and the address. In the next step, copy this text, removing the ssh command from the front of the string.
Install PuTTY on OpenShift Configure a PuTTY Session Step 2: Get the SSH address screenshot
Step 3: Enter the Address into PuTTY
In the Session category, under the Host Name form, paste the text you copied from the previous step, remembering to remove thessh command from the begining of the string.
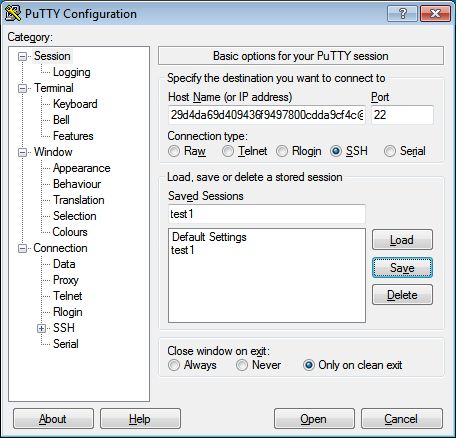
Install PuTTY on OpenShift Configure a PuTTY Session Step 3: End the Address into PuTTY screenshot
Step 4: Associate Your SSH Key with the Session
In the Category tree, expand the Connection and then SSH categories and select Auth. Click on the Browse button and navigate to the .ssh directory in your user folder C:\Users\<user name>\.ssh and select the .ppk file you saved there.
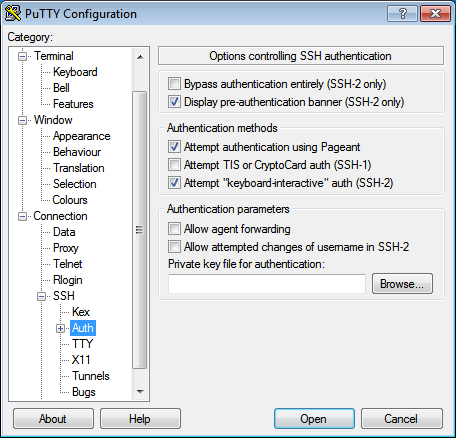
Install PuTTY on OpenShift Configure a PuTTY Session Step 4: Associate the ssh key screenshot
Step 5: Save Your Session
In the Category tree go back to the Session category. In the Saved Sessions form name your session. We recommend using the name of your application. Click the save button and watch it pop up in the list.
Click the Open button to connect to your application.
Whenever you wish to connect to your application, simply select your session in the list. Click on the Load button and then click on the Open button.
Install PuTTY on OpenShift Configure a PuTTY Session Step 5: Save your session screenshot

Now You Are Ready to Connect to Your OpenShift Application with SSH on Windows


See the SSH page for a list of commands and things you can inside of an SSH session using your Windows machine.
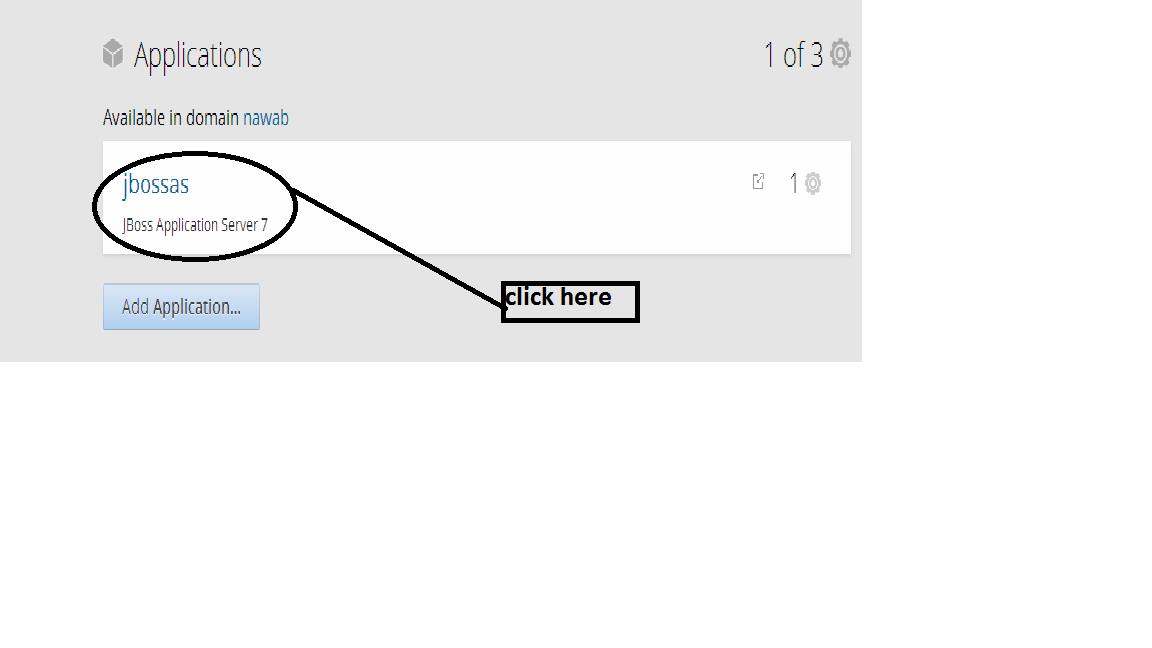
how to find credentials for openshift

goto your application again signing in again to www.openshift.com and clickon your application-
now you see credentials to your application-

SSH ADDRESS TO YOUR APPLICATION

the address to your application will be mentioned on the right side of the application
as -
1.click on -"want to login your application"
2.address comes with ssh ...copy and paste the address.

USERNAME-
the openshift username you use to login.
(as "bondkn@gmail.com")

PASSWORD-
the openshift password you use to login
(as *********)


Deploy an application on our openshift server using FTP client or Winscp

Credentials required
1.SSH Address
2.Username
3.Password

(if you don't know the credentials check this link how to find credentials for openshift )

1.open winscp

2.File protocol-sftp
(select from dropdown)

3.Hostname: your  SSH Address.
4.username:your username for openshift(the full email id).
5.password: your openshift password you use to login.
6.private key: select the .ppk file (generate by putty key gen) for authentication.
(if you don't know how to generate private key-click on this link "how to generate private key by putty keygen)

click on login.


7. after login-


drag and drop your war files and do whatever you want in jbossas in the servers directory.

everything will be live updated and deployment will be reflected live.


configuring a server on openshift(example JBOSS 7.1 with java)

for creating an application on Openshift you must have a registered account on Openshift.
If you don't have an openshift account,follow the following link to make one-
how to create an account on openshift

Configuring JBOSS server on openshift-
1.log into  Openshift.
2.you will be redirected to application page(if not click here--: openshift application page.)
3.click on "create your first application now",you will be redirected to application selection page.(if not,click here--: openshift application selection page)
4.Under Java Heading ,Select- click on JBoss Application 7.

Filling Form for Jboss Webserver

1.Public Url(mandatory) -
This will be the Url where the application will be hosted,give an appropriate name
for our example it is - jbossas-nawab.rhcloud.com

2.Source Code(optional)-
you can use GIT to upload source code directly to openshift.
(the configuration is command line based and very hectic,not recommended,we are any way going to upload our code on server using FTP clients)

3.Scaling-
Select - no scaling

Click on "Create application"

your application server is ready and you will be directed to the configuration page.

the only important thing to note here is-
goto your application again signing in again and clickon your application-
now you see credentials to your application-

the address to your application will be mentioned on the right side of the application
as -
1.click on -"want to login your application"
2.address comes with ssh ...copy and paste the address.


(to deploy data onto this server,you need to install some applications onto your system,
click here to goto deploy an application on server page(application installation phase))


Openshift-How to create a new profile on Openshift

To create an Application on Openshift,first of all you must have a valid account on openshift.

CREATING AN OPEN SHIFT Account and Logging In.
1.Creating an account on Openshift is free,click on the link below to Signup on Openshift.

-click on-Creating a profile on Openshift

2.you will receive an email to your email id to verify the account,after verifying you are ready with an openshift id.

3.click on the login link to go to the login page.
a.enter your login id.
b.enter your password.

4.Application home page gets opened up.


how to have a free hosting on openshift, openshift- free hosting online(supporting JAVA, PHP ,JBOSS,PHPadmin and databases like mysql and mangoDB)

wandering across the web i visited Openshift  by redhat ,which provided free hosting ,with Gen Next servers and applications.

Servers that are supported are-

Java(JAVA EE 6)
-JBoss 7.0
-Apache 7.0
-Apache 6.0
-vert.x.2.1
-capeDward
-Wildfly8

PHP
-Php 5.3
-PHP 5.4
-PHP 5.4 with zend server 6.1
-cake PHP
-reveal.js

Instant applications like-
-Jenkins
-AeroGear Push 0.x
-Drupal 7
-Wordpress 3.x


The Tutorial involves-

1. Openshift-How to create a new profile on Openshift

2.configuring a server on openshift(example JBOSS 7.1 with java)

3.how to find credentials for openshift

4.Setup -RHC SETUP (ruby installer,openshift gem,putty keygen installer and winscp installer)

5.how generate private key by putty keygen for openshift(by putty keygen)


6.Deploy an application on our openshift server using FTP client or Winscp


Ehsaas- software to connect without wires or internet

it's been some time working on Ehsaas-though the work on Ehsaas has been stopped,
but in retrospection here is the link to the original blog

Ehsaas software link(click here)


Ehsaas is a s/w hub ,an ambitious project to connect all...for chatting,im,file sharing,talking...without the need of internet or any paid application...!!!
THE SOFTWARE'S first version (version 1.0) has been devoloped
and is under...intense RESEARCH AND DEVOLOPMENT..!!!
....................................
bein devoloped by
project lead nd CEO-Chief Executive officer-

KHAWAR NAWAB
https://www.facebook.com/khawar.nawab
team members-

COO-chief Operation Officer-
MOHAMMAD FAISAL
https://www.facebook.com/m.faisal6621
https://www.facebook.com/ermohammadfaisal
http://ermohammadfaisal.blogspot.com/

deputy lead-
MOHD. WASI
https://www.facebook.com/er.mohdwasi

backend manager-
AZHAR AHMED
https://www.facebook.com/profile.php?id=100002069984014

senior software devoloper-
SACHIN KUMAR
https://www.facebook.com/profile.php?id=100002070875521

BACK END & SUPPORT-
ANCHIT MITTAL
https://www.facebook.com/anchit.mittal
TARUN JAIN
https://www.facebook.com/profile.php?id=100000447206383
SAHIL TANEJA
https://www.facebook.com/er.sahiltaneja
SAHIL THAKUR
https://www.facebook.com/profile.php?id=100001836452038
RAMAN KUMAR
https://www.facebook.com/profile.php?id=100001696599091&ref=ts
SHIPRA SHUKLA
https://www.facebook.com/profile.php?id=1766213118
SHUBHAM SAI SOTI
https://www.facebook.com/shubhamssoti
RUCHIKA RITZY
https://www.facebook.com/profile.php?id=100001214504309
SARIM BASIT
https://www.facebook.com/sarim.basit


Ehasaas Lauch Khawar Nawab